
Container Security Best Practices

As companies push code faster and break applications into smaller microservices, containers have become essential for modern developers and operations teams. The flexibility, scalability, and efficiency they offer make them an attractive choice for packaging and deploying applications. However, with great power comes great responsibility, and securing containers is paramount in this dynamic landscape. In this comprehensive guide, we will delve into the best practices for container security, ensuring your applications and data remain protected within this revolutionary paradigm. We are going to touch on the following sections in this blog post:
Container Image Hardening
Container image hardening is the first line of defense in your container security strategy. We will explore the crucial steps for locking down your containers, including minimizing the attack surface, restricting user privileges, and leveraging namespaces and seccomp profiles to limit system calls.
Container Image Scanning and Signing
Container image scanning is a vital practice that identifies vulnerabilities within your images. Additionally, container image signing employs digital signatures to guarantee the authenticity and integrity of your images, ensuring that only trusted sources can deploy them. We will provide insights into the tools and techniques that make these practices an integral part of your security arsenal.
Software Bill of Materials (SBOMs) for Container Images
The world of container security is all about transparency and trust. We’ll introduce you to the concept of SBOMs for container images. By adopting this practice, you’ll gain a clearer view of the components within your containers, facilitating better decision-making, and ultimately bolstering security.
Monitoring Running Containers
Security does not stop at the deployment phase. Real-time monitoring of running containers is crucial for identifying suspicious activities, unusual network traffic, or performance anomalies. We will discuss the tools and strategies to keep a vigilant watch on your containers, allowing you to swiftly detect and respond to security incidents. We will also cover essential security practices for running containers in production, ensuring your containerized applications remain protected throughout their lifecycle.
Hardening Your Containers
Step 1: Harden the Code
The first step in our container hardening process involves examining the very heart of your application: the code itself. Using static application security testing (SAST), you can scan your codebase for vulnerabilities and misconfigurations. Integrating SAST tools into your CI/CD pipeline helps ensure that the code you’re deploying meets a minimum standard of security and quality. By eliminating code vulnerabilities and misconfigurations early in the process, you significantly reduce your container’s attack surface. SemGrep is a great open-source SAST tool that can be used within you CI/CD pipelines or even locally to scan your code.
Step 2: Harden the Image
Once your code is in good shape, it’s time to focus on the container image. Hardening the image means reducing vulnerabilities and removing unused packages and libraries from the base image. Choosing the most minimal base operating system (OS) image is a great start to keeping your container secure. Consider using Distroless images, which contain only the application and its necessary dependencies, leaving out unnecessary components often found in a standard Linux distribution.
Additionally, using multi-stage builds and official base images can help further streamline the image and reduce its attack surface. Always ensure that your base image is sourced from trusted repositories. If you must use a public image, undergo a rigorous hardening process to remove any unwanted dependencies. By applying these principles, your containers will be leaner, meaner, and more secure.
Step 3: Remove Sensitive Information
Docker images can inadvertently leak sensitive information contained in the Dockerfile, including secrets like passwords, API keys, and tokens. To maintain the integrity of your sensitive information, employ a secrets management tool, such as AWS Secrets Manager or KMS, during the build process. You can also use Gitleaks, a free and open-source tool, to scan for and eliminate secrets, safeguarding your container images from accidental exposure.
Step 4: Run as a Non-Root User
By default, containers run with root privileges, which can pose security risks. It’s generally considered best practice to run containers as non-root users. You can easily achieve this by specifying a non-root user in your Dockerfile. Removing unnecessary users from your container further reduces potential vulnerabilities and helps keep the container configuration to a minimum, enhancing security. You can help enforce this practice with an admission controller such as Kyverno. Kyverno has a policy that is written to protect your cluster by denying any container from running if it is being run as root.
Step 5: Ensure Alignment With Security Best Practices
A couple of minor changes can make a big difference:
Leverage ADD vs. COPY: The ADD instruction in a Dockerfile can retrieve files from remote sources, potentially introducing security risks. To mitigate these risks, use the COPY instruction instead, which only copies files from your local machine to the container filesystem. This simple change aligns with best security practices, as it avoids potential security issues associated with ADD.
Avoid SSH within containers: Running SSH within a container can complicate security management, making it challenging to control access policies and security compliance, manage keys and passwords, and handle security upgrades. To maintain the principles of immutability and container ephemeral nature, it’s advisable to avoid using SSH within containers. Troubleshooting can be accomplished more securely in lower environments using docker exec.
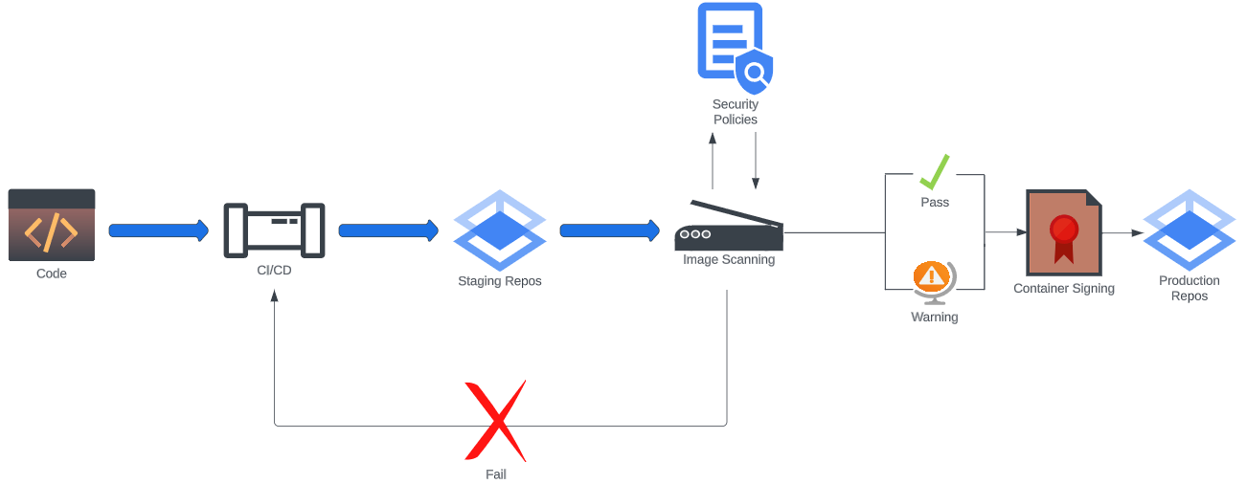
Container Image Scanning and Signing
When it comes to container security, scanning isn’t a one-and-done affair; it’s a dynamic process that plays a vital role at multiple stages of your container’s journey. Let’s dive into how scanning fits seamlessly into your container security strategy.
Pipeline Scanning
Your continuous integration and continuous delivery (CI/CD) pipelines are the unsung heroes in the battle for container security. By automating the scanning process, you ensure that vulnerabilities are caught before they make their way into your container registry. CI/CD pipelines streamline the development and delivery process, allowing developers to make small, iterative changes to their code while maintaining a consistent, reliable delivery pipeline. Meet Grype, an open-source tool from Anchore that scans for vulnerabilities before your container gets its moment in the production spotlight.
Registry Scanning
Before your container takes its final leap into the registry, it’s crucial to minimize vulnerabilities. However, it’s a reality that new vulnerabilities and exploits are always on the horizon, regardless of the age of your code. That’s where registry scanning comes into play. It keeps a vigilant eye out for new common vulnerabilities and exposures (CVEs) by checking databases like the National Vulnerability Database (NVD). By scanning images in the registry, you ensure that even the most up-to-date threats won’t go unnoticed.
Runtime Scanning
Once your container is out in the wild, runtime scanning becomes your frontline defense. It not only unveils misconfigurations within your container but also tracks the assets and the images they’re running. This vigilance ensures that no vulnerable images slip into your production environment unnoticed. Snyk Container is one example of a modern tool able to perform runtime scans on containers used in the production environment. This tool uses an agent installed on the cluster to track the images in use, scan them in the registry, and flag any misconfigurations or known vulnerabilities, all in real-time.
Signing the Image
Imagine having a seal of trust on your container image, guaranteeing its authenticity and protecting it from potential man-in-the-middle (MITM) attacks. That’s precisely what image signing achieves. It adds a digital fingerprint to your image, making it tamper-evident and verifying its source. When you push an image to the registry, cryptographic testing verifies its trustworthiness. The producer of the container image typically handles this process, and consumers verify signatures when they pull an image. If the signature doesn’t match or fails decryption, it’s a clear warning sign that the image is untrustworthy.
Sigstore, an open-source project, can handle your image signing with the assistance of Cosign. This dynamic duo adds the digital fingerprint to an image before it lands in the registry. This ensures that any future consumers of the image can trust its source and know it hasn’t been tampered with. If the signature doesn’t check out, you know it’s time to exercise caution and avoid deploying that image in your environment. Check out my previous two blog posts, Signing Software Artifacts With Cosign and How to Sign Container Images Using Cosign, where I go more in-depth on the importance of signing container images and how to utilize Cosign to do so.
Software Bill of Materials
Software Bill of Materials (SBOMs) are like a detailed inventory list of all the dependencies lurking within your containers. The true power of SBOMs lies in their ability to uncover those elusive zero-day exploits – vulnerabilities that are so fresh they haven’t even been officially documented yet. Imagine having a map that pinpoints the exact containers housing these newfound vulnerabilities. SBOMs do just that; they dissect your container’s dependencies, leaving no stone unturned to identify what needs patching and eliminate potential vulnerabilities.
Generating SBOMs is a crucial step in your container security journey, and Syft, an open-source tool from Anchore, can help. Whether you’re dealing with container images or file systems, Syft is your go-to command-line tool and Go library for generating SBOMs. It meticulously lists out all the components in your containers, helping you understand their inner workings.
But the power of Syft doesn’t stop there. When paired with a scanner like Grype, it becomes an unstoppable force for vulnerability detection. Grype and Syft work hand-in-hand, making sure that you not only know what’s inside your containers but also uncover potential security threats before they become full-blown issues.
It’s not just about having the containers; it’s about understanding them inside and out. With SBOMs, Syft, and Grype, you’re well-equipped to navigate the labyrinth of dependencies, ensuring that your containerized applications remain secure and your organization stays protected.
Monitoring Running Containers
There are several key steps you can take to safeguard your containers while maintaining system integrity, significantly reducing your attack surface, and minimizing the impact of potential breaches.
Run Your Containers in Rootless Mode: This involves running the Docker daemon as a non-root user, ensuring that your containers are built entirely in userspace. This approach adds an extra layer of security when creating container images.
Avoid Mounting Host Paths: While Docker volumes can be mounted in read-write mode, sensitive data on your host’s file system should remain off-limits. Minimize the use of host path mounting to ensure that your containers don’t have unnecessary access to sensitive host data.
Set Filesystems and Volumes to Read-Only: Running containers with a read-only file system aligns with the principles of immutability and container ephemeral nature. It reduces the risk of malicious activity, such as deploying malware or modifying configurations. You can set this attribute for the Docker run command or as part of an ECS task definition when deploying containers in ECS/Fargate. It is important to clarify that this best practice primarily refers to the container’s root filesystem. For specific use cases, such as batch processing or ETL jobs where data needs to be written, containers may require write access to dedicated volumes. In these scenarios, the goal is to limit write access to only the necessary volumes, while keeping the core container filesystem read-only to minimize the potential for unauthorized changes or the introduction of malware to the host system running the containers.
Avoid Running Privileged Containers: Running containers in privileged mode exposes the host’s kernel and hardware resources to potential cyber threats. This practice is generally discouraged in a production environment. Avoid adding the –privileged attribute when starting a container. Privileged containers inherit all of the Linux capabilities assigned to the host’s root user, presenting security risks.
Limit Container Resources: By setting resource limits for containers, you ensure the availability of resources for all containers running on a host. This defensive approach mitigates attacks related to CPU and memory denial-of-service or consumption, reducing the impact of breaches for resource-intensive containers.
Segregate Container Networks: Employ network policies to restrict container network traffic to and from approved destinations. It’s a best practice to deploy containers in a Virtual Private Cloud (VPC) to isolate hosts from external threats. Additionally, using Web Application Firewalls (WAF) can help restrict layer 7 traffic. Custom networks are preferable to relying on the default bridge network, and AWS ECS users should utilize the AWS VPC network mode for enhanced network isolation.
Harness the Power of Service Meshes: A service mesh provides a crucial layer of infrastructure to manage and secure communication between containers. By acting as a dedicated, configurable infrastructure layer, a service mesh, such as Istio or Linkerd, can offload security and networking responsibilities from individual applications. It uses “sidecar” proxies, which run alongside each container, to provide features like mutual TLS (mTLS) encryption for all service-to-service communication, fine-grained access control, and network policy enforcement. This not only standardizes security across your containerized environment but also provides valuable observability and network mapping, making it easier to diagnose issues and identify suspicious traffic. The service mesh complements other security best practices by providing a powerful way to enforce zero-trust principles and defend against lateral movement within your container cluster.
Enhance Container Isolation with Namespaces: Linux namespaces provide isolation for running processes, preventing lateral movement if a container is compromised. This is an effective strategy to maintain the security of your containers.
Implement Robust Auditing and Forensics: Collecting ample amounts of data on running containers is essential for troubleshooting and ensuring compliance. Robust log and analytics collection can be a game-changer in detecting malicious threats within your container environment.
Keep Docker Engine and Host Updated: Regularly update the Docker engine and host to mitigate software vulnerabilities. AWS users are recommended to employ Fargate to offload the responsibility of keeping the Docker engine, containers, and the underlying host up to date.
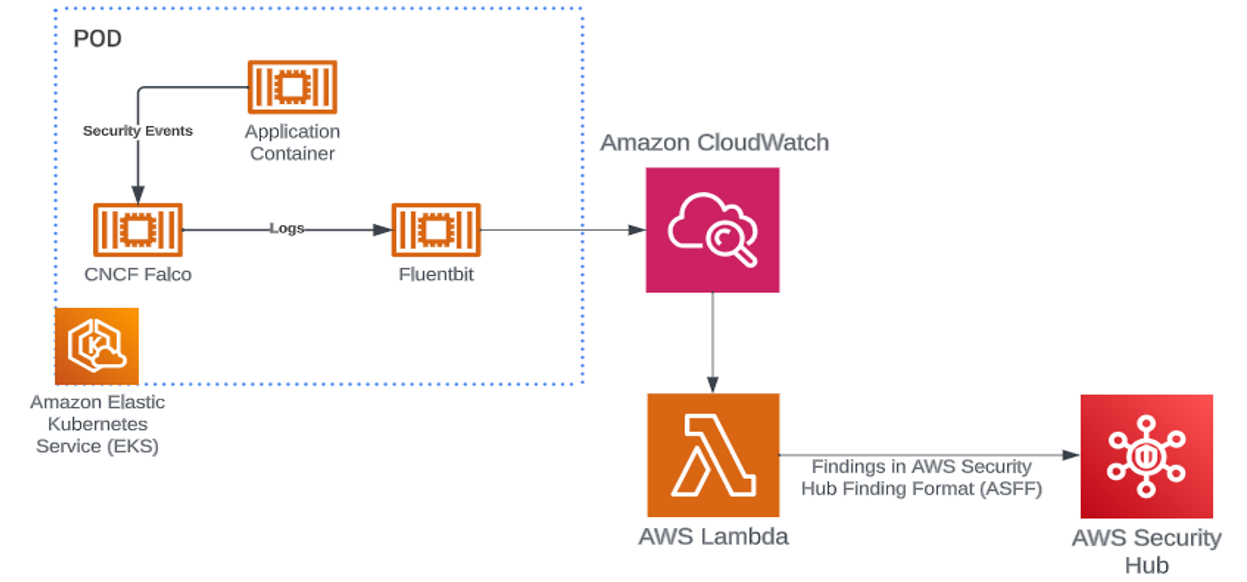
Security isn’t just about laying down the groundwork; it’s about continuous vigilance. Monitoring is the sentinel that guards your running containers, ready to detect any suspicious activities that might indicate a breach. Whether it’s identifying indicators of compromise (IOCs), zero-day attacks, or ensuring compliance with your organization’s security policies, continuous monitoring is your eyes and ears in the containerized world.
The open-source tool Falco can be used to monitor your running workloads, offering real-time detection and immediate response to any unexpected behavior, intrusions, or data theft within your container environment. Check out a great blog about Falco written by Dustin Whited and Dakota Riley, Threat Detection on EKS – Comparing Falco and GuardDuty For EKS Protection. By marrying best practices with vigilant monitoring, you can confidently navigate the dynamic landscape of container deployments, ensuring the security and stability of your digital infrastructure.
Once your containers are up and running, continuous monitoring is essential. Here’s what to watch for:
Detection of Indicators of Compromise (IOCs): IOCs provide forensic evidence of potential intrusions. They help security professionals and administrators spot intrusion attempts and other malicious activities within your container environment.
Detecting Zero-Day Attacks: User behavior analytics is your best defense against zero-day attacks. By understanding and identifying deviations from normal behavior patterns, you can spot potential zero-day attacks before they escalate.
Compliance Requirements: Use admission controllers to enforce container standards and deployment procedures, ensuring your containers remain compliant with your organization’s security policies.
Detecting Abnormal Behavior in Applications: Analyze events collected from your containers to uncover suspicious behavior patterns that might indicate unauthorized access or other security breaches.
By implementing the best practices outlined in this blog post, you will secure your containers from the outset, minimize vulnerabilities, and ensure that only trusted and secure containers enter your registry. From hardening your code and images to establishing comprehensive scanning at every stage of the pipeline, these practices create multiple layers of defense that adapt to the evolving threat landscape. Remember that container security is an ongoing journey — by making these practices part of your standard workflow, you'll build resilient applications that can withstand both current and emerging security challenges.
If you have any questions or would like to discuss this topic further, feel free to contact us.